Power backup Generators step up as your savior when an unexpected grid failure occurs. Whenever there is a severe weather storm or you are operating on some remote construction sites, we have all seen blackouts. To save your day, you must start your generator immediately. But these generators do need timely maintenance and proper care so they are there when you need them most.
Experts recommend that regular generator testing is the only way to keep it ready during any emergency. Imagine what if you need to start the generator but are unable to do so. Following hacks and tricks on how to test a generator helps you highlight any mechanical issues, stale fuel, or sudden Electrical faults before you need to power your Home or facility.
This guide by HuaQuan covers How to Test a Generator, quick tips and tricks. What tools must you have? And the warning signs that indicate generator problems you must never ignore.
Why It’s Important to Test Your Generator
Generator testing is never a recommendation. This is the must follow part to give your power backup system readily available whenever needed.
- Preventing unexpected breakdowns: We all know that if any electronic device is not in use for several months, it starts to degrade. Similarly, with generators, being idle for months makes the seals dry out. The batteries die, and pests can even chew through your cable wiring. With regular testing, you can easily point out these issues before they turn into huge mechanical failures.
- Ensuring optimal performance during power outages: Regularly check whether your generator can easily handle the full electrical load of your job site without tripping breakers, fuel stalling, or power surge.
- Extending the lifespan of your generator: Follow the manufacturer’s recommended schedule to check its internal components. Lubricate the screws and windings with fresh oil. Take out any moisture buildup from the generator exhaust system and alternator.
Tools Needed to Test a Generator
Stop. Before you jump onto the recoil code. Or randomly turn on the starter key. It’s better to gather all the necessary diagnostic tools for generated testing to get accurate results.
Multimeter
A digital multimeter helps you analyze your generators’ electrical health.
- Measuring voltage output: Use a voltage output device to cross check if the generator is producing the right 120V or 240V AC power.
- Checking for proper grounding: Always double check the grounding. It helps you lessen the chances of any electric shock mishaps when the generator is running continuously.
Load Bank
The electrical engineers prefer load banks for professional testing. Although you can plug in to space heaters for a basic load back test. It’s better to get some experts’ help for professional and accurate reading.
- What it is and how to use it: A load bank is an electrical device that generates an artificial load to test the generator to evaluate whether it can handle heavy machinery or not. The power it generates ultimately dissipates as heat.
- Simulating full-load conditions: You can push your generator to its 100% capacity with the load bank test. Double check if the engine and alternator overheat or fail under maximum stress or not.
Tachometer
While following the guide on how to test a generator, you must own a tachometer. Our tachometer is a specific engine that usually runs at its maximum speed to produce the right electrical frequency. In North America, the frequency is usually 60Hz.
- Measuring engine speed for efficiency: Calculate the RPM revolutions per minute of your engine with the digital tachometer.
- Ensuring correct RPM levels: Generally, the standard generators available in the market run at 3600 RPM. If the RPM rate drops too low, it will potentially damage your sensitive electrical equipment and devices.
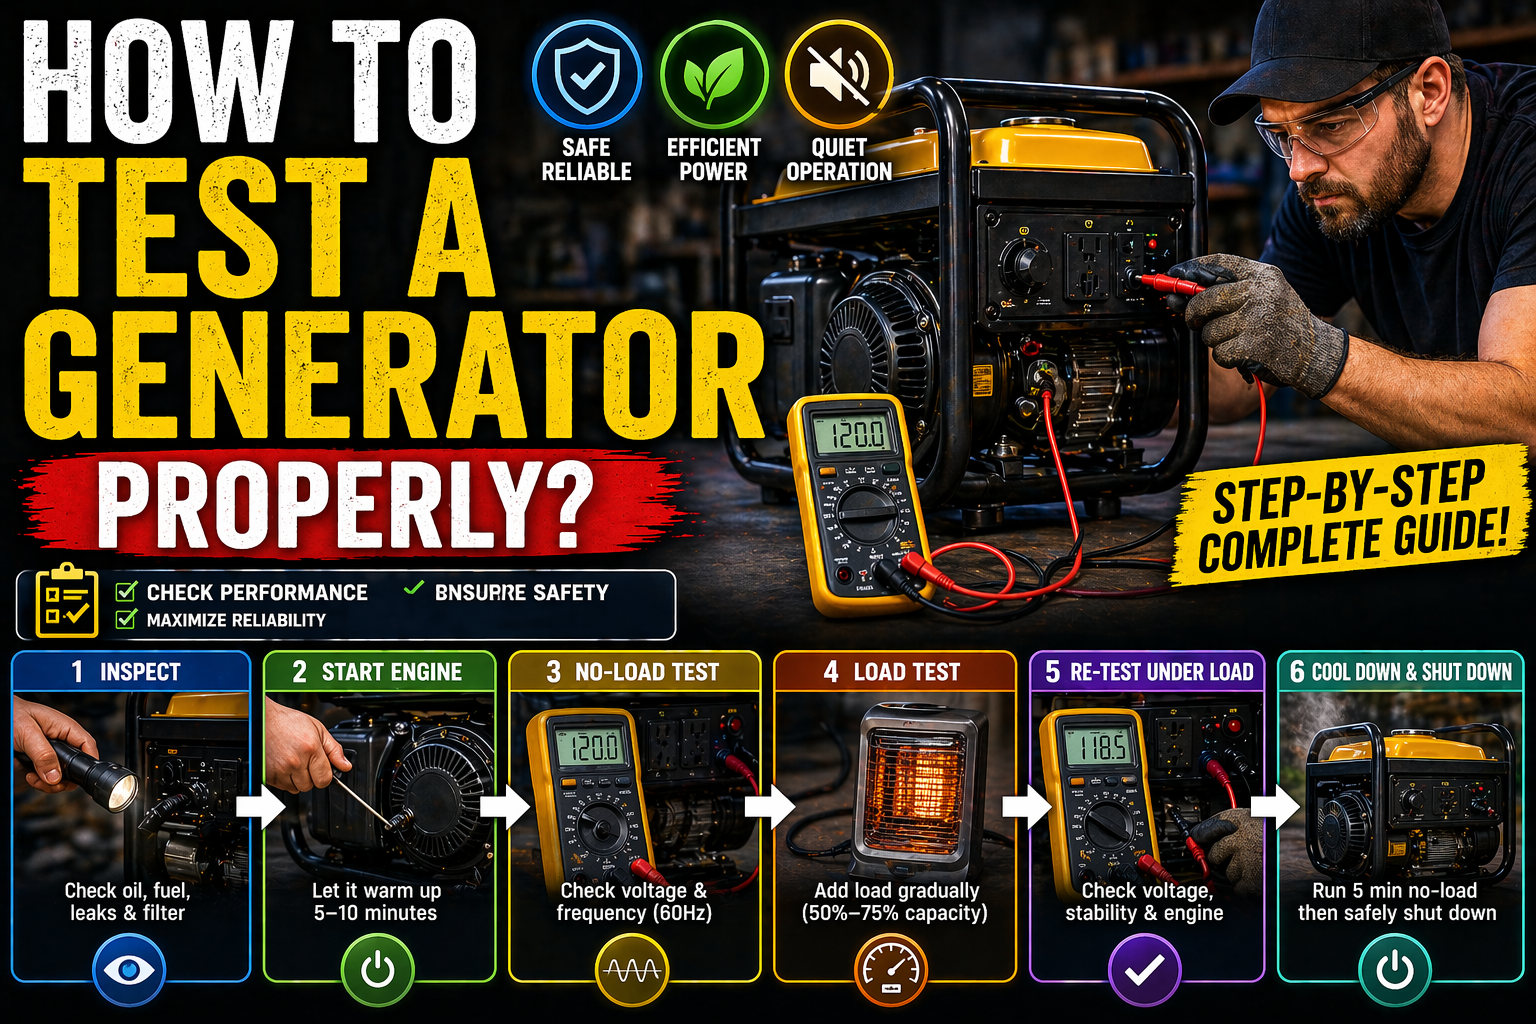
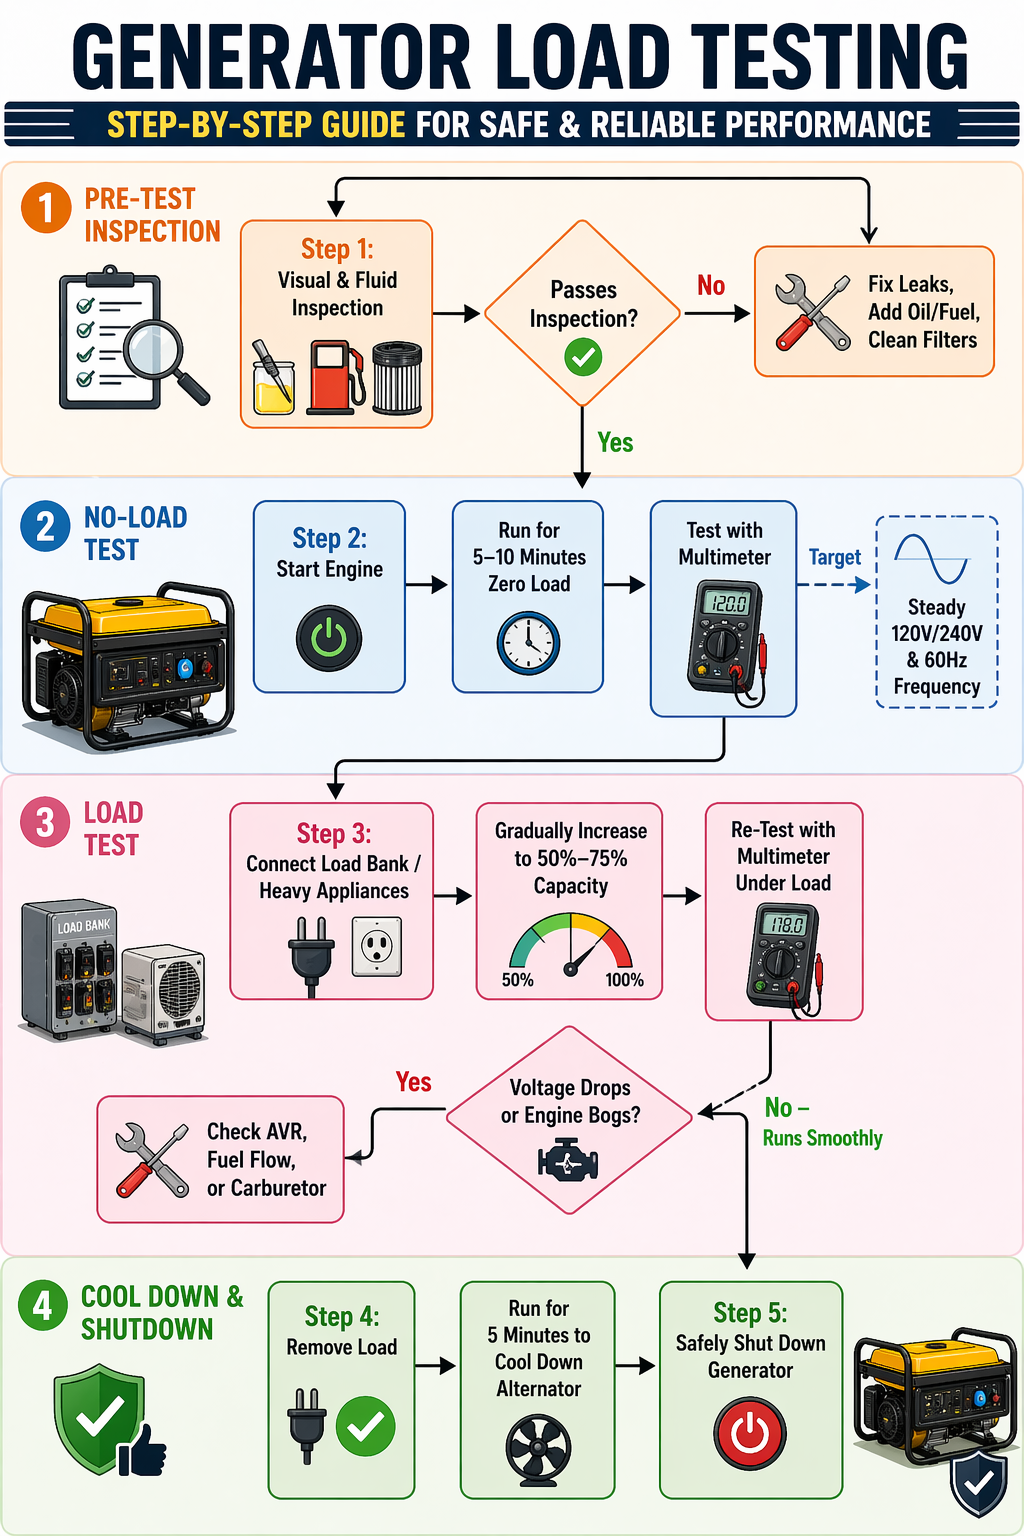
Step-by-Step Guide on How to Test a Generator
Follow our step by step guide to find out any mechanical or electrical health failures or issues with your power backup system.
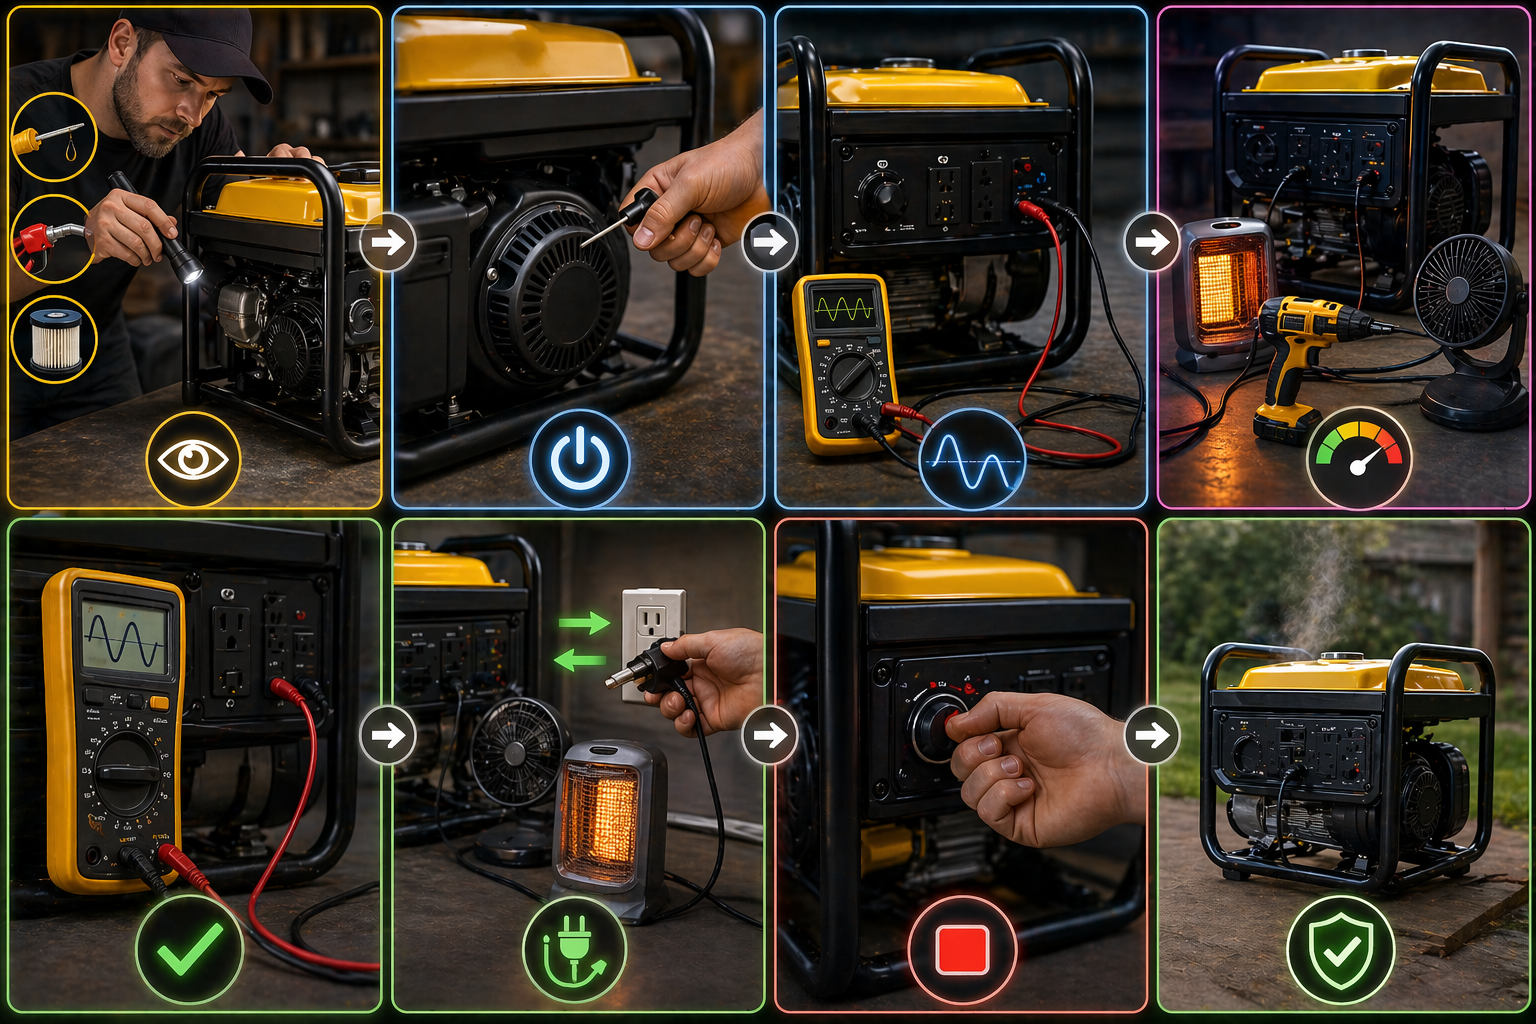
1: Inspect the Generator
Do not start a generator without thoroughly checking each.
- Visual checks for damage or leaks: Check for any burnt electrical wires, oil puddles inside the engine block, or cracked fuel hoses.
- Oil, fuel, and coolant levels: With the dipstick, check the oil level. See if it is full and golden. When the oil turns black or is sludgy, immediately replace it. For a liquid cooled standby generator, check the radiator coolant levels.
2: Perform a No-Load Test
- Running the generator without any load: Power on your generator without plugging in any outlets. Leave it for five to ten minutes so it matches its normal operating temperature.
- Measuring output voltage and frequency: With the multimeter, connect your generator to the main receptor cells. The reading must be roughly up to 120V/240V and 68Z. If the voltage and frequency vary wildly, the generator’s Automatic Voltage Regulator (AVR) is not working properly and might fail.
3: Perform a Load Test
- Connecting load bank or appliances: Once the generator is warm enough, apply a load. If you do not have a load bank available, get some help from space heaters, connect hair dryers, or halogen lights, which are a great option to check the load. Put the load until you reach up to 75% of your power generators’ running wattage.
- Monitoring how it handles the load: Now, carefully listen to your engine sound. There must be a brief noise until it settles into a smooth, steady sound.
4: Check the Voltage Output
- Comparing actual output with manufacturer specs: Whenever you connect any heavy appliance, check the engine receptor cells again with the multimeter. A fine working generator always has a stable voltage.
- Ensuring stability under different loads: According to the professional engineer’s evaluation, generators generally complain of a brief drop in their voltage whenever you connect to a heavy motor. But they immediately recover.
5: Inspect the Fuel System
- Checking fuel quality and filters: When your backup system is running under load, now check all your inline fuel filters. There should not be any air bubbles or dark debris inside the fuel.
- Inspecting fuel lines for leaks: Close the check for any tiny cracks in the rubber fuel lines. The vibration of a running engine helps you find them easily.
Common Issues to Look for During Testing
Now it’s time to keep an eye on the most common warning signs your generator exhibits whenever you are running a test.
- Voltage fluctuations: If any device or lights you plugged in flicker or dim rapidly, the engine alternator’s internal components are failing.
- Overheating: Sometimes people complain of burning plastic smells because the engine exhaust exhibits bright red glows. It signals towards heavy overload, or there is not sufficient oil. Blocked cooling vents are another reason for your engine overheating.
- Unusual noises: Every generator makes a steady hum sound. But loud knocking, rattling, or backfiring noises point towards some mechanical issues.
How Often Should You Test Your Generator?
- Recommended testing intervals: For portable home backup power units, no load tests every month, and a 30 minute load test every three months is enough. For permanent standby generators, set the automatic self test on a weekly basis.
- Signs your generator needs testing immediately: If your generator is not in use for at least six months or you have come to know about any major storm forecast in your area within the week, test your generator immediately.
Troubleshooting Tips If Test Results Are Unsuccessful
Generators, likewise, all other electronic devices, fail sometime in their life. Do not panic. Most of the issues can be fixed there.
- Low voltage output: If the Automatic Voltage Regulator (AVR) fails, or your engine runs below 3600 RPM, you might see a low voltage output fluctuation.
- Engine misfiring or stalling: Engine stalling occurs when the stale gasoline fuel clogs the dirty carburetor. Clogged air filters or any faulty spark plug shut down the oxygen supply, leading to engine misfiring.
- Poor fuel efficiency: If your engine is emitting black smoke or burning the gas abnormally fast, maybe the carburetor needs some help. It is mixing very low amounts of air with too much fuel.
Safety Precautions While Testing a Generator
Testing a generator means you are dealing with high voltage electricity, toxic smoke exhaust, and sometimes flammable fuels. Make sure to follow the safety precautions manufacturers and generator experts recommend, avoiding any hazards.
- Avoiding electrical hazards: Do not test your generator in the rain or stand in a water puddle. Always dry your hands while using multimeters or plugging in any test appliances.
- Ventilation and placement: Habitually conduct all your generator checks outdoors. Do not use or load a bank to test a generator inside your basement or garage, even with the doors open. All generators release carbon monoxide, which is an odorless and highly fatal gas.
- Wearing protective gear: Make sure to wear safety glasses to avoid any accidental fuel spray or battery acid. Use air production as heavy generators; noise can exceed up to 85 decibels.
Final Thoughts: How to Test a Generator
Remember, a generator is one of the smartest investments to keep on going with your comfort and safety. Dedicating a few hours every year for its testing, you can ensure your generator always turns on right away whenever there is a blackout.
Regular testing ensures maximum performance and guarantees that any grid failure would not affect your lights or other home activities. Remember, finding clogged carburetor filters or dead batteries on a sunny Saturday afternoon is far better than finding them in the middle of a freezing midnight blackout. Always follow your manufacturer’s recommended test schedule to keep enjoying reliable power for years.
Do not wait for a sudden blackout to know if your generator needs some repair or expert help. Contact HuaQuan today for professional support and enjoy a premium, ultra reliable power solution for any emergency situation.